
Imagine settling down to watch a movie or join a video call, only to be met with deafening silence from your Windows 11 PC. It’s a common and incredibly annoying problem.
The frustration of not having sound can ruin your day, whether it’s missing important audio cues in a meeting or losing the enjoyment of your favorite show. It disrupts everything.

The First Line of Defense: Quick and Easy Checks
Check the Obvious:
Volume Controls: Ensure the system volume isn’t muted or set too low. Check both the taskbar icon and any physical buttons on your device.
App-Specific Volume: Double-check the volume settings within the specific application you're using, as it might be turned down separately.
Headphone/Speaker Connections: Ensure all cables are securely plugged into the correct ports. Try switching to different ports if needed.
Bluetooth Connections: If you're using Bluetooth, verify that your device is properly paired and connected to the computer.
Restart Your Computer
Sometimes, all it takes is a quick reboot to fix minor software glitches. Restarting your computer can clear any temporary issues that might be preventing your audio from working properly.
A restart also helps refresh your system’s resources, ensuring there are no lingering conflicts between software components. It's a simple but effective step to try before moving on to more complicated fixes.
Check for Physical Damage
Inspect your cables, headphones, and speakers for any visible damage. Frayed wires or bent connectors could be causing the issue with your sound.
If you notice any damage, such as cracks in the speaker or faulty cables, consider replacing the damaged parts. This is a quick way to rule out any hardware-related problems.
Diving Deeper: Software and Driver Troubleshooting
Check the Default Playback Device
When troubleshooting sound issues, one of the first steps is to ensure your computer is sending audio to the right device. It’s easy for the wrong output device to be selected, especially if you’ve recently connected new headphones, speakers, or a Bluetooth device.
Step-by-Step Guide:

Right-click the speaker icon on your taskbar (bottom-right of the screen).
Select “Sound settings” from the context menu.
In the “Output” section, make sure the correct audio device (speakers or headphones) is selected from the dropdown menu.
Click on the selected device to open its properties, and verify that the volume level is set appropriately.
By following these steps, you can quickly check if your audio is routed to the correct device, whether you’re using your computer’s speakers, headphones, or an external Bluetooth speaker.
Update Your Audio Drivers
Why Drivers Matter
Audio drivers act as a bridge between your operating system and your computer’s audio hardware. They enable proper communication, ensuring sound plays through your speakers or headphones as intended. Without updated drivers, you may encounter audio issues or system incompatibility.
Step-by-Step Guide:

Right-click the Start button and select “Device Manager”.
Expand the “Audio inputs and outputs” and “Sound, video, and game controllers” categories.
Right-click on your audio device (e.g., Speaker (High Definition Audio Device)). For Wired Speaker and headsets.
Select “Update driver”.
Choose “Search automatically for updated driver software”.
Follow the on-screen instructions to install the latest driver.

Alternative: Manual Driver Installation
If the automatic update doesn’t work, you can manually download the latest drivers from the manufacturer’s website (e.g., Realtek, Creative, or your motherboard vendor). Once downloaded, run the installer and follow the provided instructions to update your audio drivers.
Roll Back Audio Drivers
When to Roll Back
If a recent driver update caused your audio issues, rolling back to a previous driver version might fix the problem. New drivers can sometimes introduce bugs or conflicts with your system.
Step-by-Step Guide:

Right-click the Start button and select “Device Manager.”
Expand the “Audio inputs and outputs” section.
Right-click on your audio device (Speaker) and select “Properties.”
Go to the “Driver” tab and click “Roll Back Driver” if the option is available.
Follow the on-screen instructions to revert to the previous driver.
Run the Audio Troubleshooter
Step-by-Step Guide:

Press the Windows key + I to open the Settings app.
Click on “System” in the left-hand menu.
Select “Sound” from the list of options.
Scroll down and click “Troubleshoot” under the “Output” section.
Follow the on-screen instructions to allow the troubleshooter to scan for and resolve any issues.

Explanation
The built-in Windows audio troubleshooter is a powerful tool that can help automatically detect and fix common sound problems. It scans for issues like missing drivers, muted devices, or incorrect settings.
Running the troubleshooter saves time and effort, especially if you're not familiar with audio configurations. It offers a quick fix for many users, ensuring sound issues are addressed without diving deep into manual troubleshooting.
Check Windows Audio Service
Why the Service Matters
The Windows Audio service is responsible for managing the audio processes of your system. If it's stopped or not functioning correctly, you might experience no sound or distorted audio.
This service needs to be running for sound to work properly. If it's disabled or encounters an error, your computer will not be able to process audio output correctly, affecting all playback functionality.
Step-by-Step Guide:
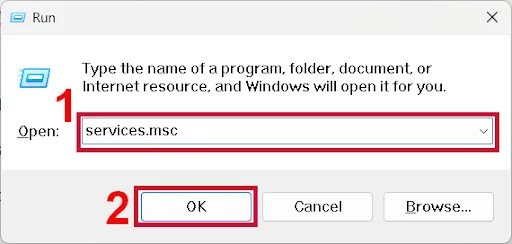
Press the Windows key + R, type “services.msc” and press Enter.
Scroll down and locate the “Windows Audio” service.
Check if its “Status” is “Running” and “Startup Type” is set to “Automatic.”
If it's not running, right-click on it and select “Start.”
If the Startup Type is not Automatic, right-click, select “Properties,” set the Startup Type to Automatic, click Apply, and then Start.
Also, ensure the “Windows Audio Endpoint Builder” service is running and set to Automatic.

Disable Audio Enhancements
Why Disable Audio Enhancements
Audio enhancements like equalizers or surround sound effects are intended to improve sound quality, but they can sometimes interfere with proper audio output. They may cause distortion, lag, or even prevent sound from playing entirely.
In some cases, audio enhancements can conflict with specific hardware or software, leading to issues like poor quality or no audio. Disabling them can help resolve such problems and restore clear, uninterrupted sound.
Step-by-Step Guide:
Right-click the speaker icon in the taskbar.
Select “Sound settings” from the menu.
Click on your playback device in the “Output” section.
Click “Audio enhancements” and try selecting “Off” from the dropdown.
Alternatively, navigate back and click “Additional sound settings” on the right. Select your playback device, click “Properties,” go to the “Enhancements” tab, and check “Disable all enhancements.”
External Hardware Problems
Sometimes, the issue is with the external hardware. Faulty speakers or headphones can cause no sound. Try testing your headphones or speakers with a different device to rule out hardware failure.
Loose or damaged audio cables are another common cause. If the cables are frayed or not securely connected, sound may not transmit properly. Make sure all cables are fully plugged in and inspect them for visible damage.
Internal Hardware Problems (Less Common)
Internal hardware issues, like problems with the sound card or motherboard audio chip, can sometimes be the cause of audio failures. These issues are less common but may require professional help for repair or replacement.
If your internal hardware is malfunctioning, it may need to be tested or replaced by a technician. Always ensure your sound card is properly seated, or check the motherboard for any visible damage.
BIOS/UEFI Settings
For more advanced users, it's worth checking the BIOS/UEFI settings to ensure audio is enabled. Sometimes, the sound chip can be disabled at the system firmware level, which may prevent sound output from working.
Check your motherboard’s documentation to see how to access the BIOS/UEFI settings and ensure the audio device is turned on.
Advanced Troubleshooting Steps (For More Persistent Issues)
1. System File Checker (SFC Scan)

Open Command Prompt as Administrator: Press Windows key + X and select Command Prompt (Admin) or Windows PowerShell (Admin).
Run the SFC Command: In the Command Prompt window, type the command sfc /scannow and press Enter.
This will initiate the System File Checker tool, which will scan your system for corrupted or missing Windows system files.Let SFC Complete: The scan may take some time (up to 30 minutes). Wait for the process to complete.
Once finished, it will automatically attempt to fix any corrupted files that could be causing audio issues.Restart Your Computer: After the scan and repairs are complete, restart your computer to apply any changes and check if the audio problem is resolved.
2. DISM (Deployment Image Servicing and Management)

Open Command Prompt as Administrator: Press Windows key + X and choose Command Prompt (Admin) or Windows PowerShell (Admin).
Run the DISM Command: Type DISM /Online /Cleanup-Image /RestoreHealth and press Enter.
This tool will repair the Windows image by fixing issues related to the core system files, which might be affecting your audio output.
Wait for the Process to Complete: This process can take up to 30 minutes or more, depending on the severity of the issues. Allow it to run until completion.
Restart Your Computer: Once the process is finished, restart your computer and check if the audio is restored.
3. Performing a System Restore
Open System Properties: Type “Create a restore point” in the Windows search bar and click on the System Properties result.
Access System Restore: In the System Properties window, under the System Protection tab, click System Restore.
Select a Restore Point: Choose a restore point from before you encountered the audio issue. The restore point will revert your system settings and files to an earlier state.
Follow the Instructions: Follow the on-screen instructions to start the restoration process. Your computer will restart, and the restoration will proceed.
Once complete, check if your audio works again.
Considering a Clean Install (Last Resort)
Back-Up Your Data: Before proceeding with a clean install, back up all your important files (documents, photos, etc.) since this process will erase everything on your computer.
Download Windows Installation Media: Go to the Microsoft website and download the Windows 11 Installation Media tool.
Create Installation Media: Use a USB drive (at least 8GB) to create the installation media following the on-screen instructions.
Perform the Clean Install: Boot from the USB drive, and during the installation process, choose the Custom Install option to erase the current operating system and install a fresh copy of Windows.
Reinstall Drivers: After installation, make sure to reinstall your drivers, including the audio drivers, and restore your data from the backup.
Conclusion
We’ve covered key troubleshooting steps to fix sound issues on Windows 11, including checking volume settings, updating drivers, running SFC scan, and using DISM to repair system files.
Persistence is essential—follow the steps one at a time, and don't get discouraged if it takes a little while to find the solution. Most issues are fixable!
Remember, the majority of Windows 11 audio issues are temporary and solvable. If you're still facing problems, share your experiences or ask questions in the comments below. We're here to help!
Frequently Asked Questions (FAQs):
Why does my PC suddenly have no sound?
It could be due to issues like muted volume, outdated drivers, or incorrect audio settings. Restart your PC and check settings for a quick fix.
Why is my PC silent?
Your PC might be silent due to incorrect audio output settings, muted audio, or malfunctioning hardware. Check your volume levels, audio device selection, and connections.
How to connect speakers to PC?
Simply plug your speakers into the audio jack or USB port, then select them as the default audio device in your PC's sound settings.
How do I update my audio driver?
Go to Device Manager, find your audio device, right-click, and select Update driver. Follow the on-screen instructions to search for updates automatically.
What is Realtek digital output?
Realtek Digital Output is a virtual audio device that transmits high-quality audio signals through HDMI or optical connections, offering better sound for home theater setups and external speakers.